


Headlight Upgrade
Page 1 of 2 • 1, 2 ![]()
![]()
 Headlight Upgrade
![]() mikeyzf600 Wed Dec 26 2012, 15:35
mikeyzf600 Wed Dec 26 2012, 15:35
Well, as I'm sure most of you are aware, the headlight on the 'Cat is diabolical.
So I decided to do a Xenon Retrofit on the headlight. What a difference!! I'm sure there's a bit of a divide regarding aftermarket Xenons, there is on most forums. However, this is brilliant. It's not just a HID kit in the standard housing, it's a Bi-xenon projector in the standard housing with a good xenon kit.
A few pictures of the projector itself:


(Yep, Missing a few screen bolts. Anyone know where I can get some standard ones? Lost them in the garage whilst it was in bits.)
The light output is brilliant. Considering it's a single projector it's very bright with a good beam pattern. I'm waiting for it to be a dry night so I can go and take some decent beam shots. However the weather is shocking at the moment and the Port is much more attractive than getting wet! Here are a few from the garage but they don't do it justice. They also weren't aligned properly at this point.
Dipped:
Full:

Thoughts?
Regards
Mike
mikeyzf600- 6Silver

-
 Status :
 Online Offline
Number of posts : 378
Hobbies : Electrician
Humour : Sarcastic
Registration date : 2012-07-18
![]()
![]()

TomCom- 4Gold

- Status :
Online Offline
Number of posts : 1310
Hobbies : Tattoos, PS4, Airsoft
Humour : dark humour
Registration date : 2011-08-15
![]()
![]()
Re: Headlight Upgrade
![]() biscut Wed Dec 26 2012, 20:05
biscut Wed Dec 26 2012, 20:05
biscut- 3Silver

- Status :
Online Offline
Number of posts : 217
Hobbies : IT Geek
Humour : dark and perverted
Registration date : 2012-09-20
![]()
![]()
Re: Headlight Upgrade
![]() 0ldcat Wed Dec 26 2012, 20:16
0ldcat Wed Dec 26 2012, 20:16
Merry Christmas to you too . . . Mod looks a good'un, but . . .mikeyzf600 wrote:Merry Christmas all!
Thoughts?
Regards
Mike
MoT friendly ???

0ldcat- founder
- Status :
Online Offline
Number of posts : 5229
Hobbies : Motorcycling, Cooking, Rugby
Humour : It shrank in the wash
Registration date : 2008-11-05 -

![]()
![]()
Re: Headlight Upgrade
![]() mikeyzf600 Wed Dec 26 2012, 20:20
mikeyzf600 Wed Dec 26 2012, 20:20
biscut wrote:looks really good, can I ask where you got it from ? and are kits like that expensive or are they quite reasonable ? a HID upgrade is something I am considering doing to my cat
Thanks. I got it from theretrofitsource.com. American company but very reasonable and came fairly quickly too. They do a Sportsbike Kit on there which is what I got.
0ldcat wrote:Merry Christmas to you too . . . Mod looks a good'un, but . . .mikeyzf600 wrote:Merry Christmas all!
Thoughts?
Regards
Mike
MoT friendly ???
Well, although my current car has Xenons as standard, my previous cars were aftermarket and never failed. I believe that, at the moment, it isn't tested on the MOT. I'll confirm in April.
Regards
Mike
mikeyzf600- 6Silver
- Status :
Online Offline
Number of posts : 378
Hobbies : Electrician
Humour : Sarcastic
Registration date : 2012-07-18
![]()
![]()
Re: Headlight Upgrade
![]() Rosco Sat Dec 29 2012, 02:34
Rosco Sat Dec 29 2012, 02:34
I've had my foot in both camps and your pics show a great improvement which I experienced and raved about too.
My hid may have gone faulty but as far as I was concerned it was fine since my MOT place wired it up to their light machine and it hardly moved the needle, they also said they NEED to have self levellers built in (which mine and I suspect yours don't have) as you'll be blinding other road users.
It needed a few other buys doing so I put a standard bulb back in (which is a relatively easy thing to do as the aftermarket HID daisychained off the existing bulb plug.
Interested to find out what you MOT place says.
I'd take a standard bulb with you just in case though.
So I'm currently without my HID and while I rarely if ever ride in the dark I always ride with my dipped lights on.
Interested to know what the 'law' is on this and also if insurance could be affected.
Personally I think it is a safety feature. I've driven towards old school bikes and new school bikes and the new ones do tend to catch your eye a bit more.
Good luck....keep us posted.
Rosco

Rosco- Admin2

- Status :
Online Offline
Number of posts : 6662
Humour : Oh Go On Then
Registration date : 2008-11-06
![]()
![]()
Re: Headlight Upgrade
![]() mikeyzf600 Tue Jan 01 2013, 16:18
mikeyzf600 Tue Jan 01 2013, 16:18
After doing some research, the MOT manual says something along the lines of "where HID/LED headlights are on the car, auto-levelling and headlight washers MAY be fitted, and if fitted, they must work correctly."
So I think it depends highly on how the tester interpretes the manual. However I will take a spare bulb when the time comes.
Personally, if it helps me see and be seen then I'm all for it. However I guess I'll have to wait on the MOT verdict and if I get flashed at all whilst going along.
Regards
Mike
mikeyzf600- 6Silver
- Status :
Online Offline
Number of posts : 378
Hobbies : Electrician
Humour : Sarcastic
Registration date : 2012-07-18
![]()
![]()
Re: Headlight Upgrade
![]() weasley Tue Jan 01 2013, 22:42
weasley Tue Jan 01 2013, 22:42
Their sports bike kit looks very good and appears to be a minimal effort to fit, and reversible. I'd be interested in your experience of the fitting process, light separation, housing modifications etc as well as the wiring etc.
I can't believe how cheap the kit is either!

weasley- Admin2
- Status :
Online Offline
Number of posts : 1506
Hobbies : Yes
Humour : Yes
Registration date : 2008-11-07
![]()
![]()
Re: Headlight Upgrade
![]() mikeyzf600 Tue Jan 01 2013, 23:11
mikeyzf600 Tue Jan 01 2013, 23:11
Fitting was very easy. The most annoying/time consuming part was getting the headlight off the bike. Once it's off you take everything out of the headlight I.e. the bulb and grommets etc.
Next, whack it in a preheated oven at 130C. (just call me Delia Smith!)
After around 7 mins, take it out and with a fairly big flat head screwdriver, start prising the 2 sections apart. I think there was a few clips to undo as well so don't forget those. Once it's apart a bit you can get your hands in there and pull it apart gently. If it doesn't come apart, put it in a little longer.
Once you've got it apart, if you've deformed any of the housing, just mould it back together.
Next, undo the screw holding in the retaining clip and the bulb shield/deflector and remove.
After that, put the projector through the existing hole and pull the solenoid wires through the cut out for the old bulb shield. Then you put all the silicone washers etc that came with the projector on.
It comes with a H4 adapter plate which can only go onto the projector one way to make sure it's upright in the housing. However, for some reason, Yamaha made the existing H4 cut out slightly offset so the projector would be twisted clockwise. I had to trim the metal adapter plate in a vice so that it could be rotated enough to be upright.
Tighten it all down, insert bulb and that's pretty much it. Next bit is the shroud. The one I got is called Iris. It was a bit big for the headlight, so I trimmed down the shroud with a hacksaw until it fitted snugly on the projector.
After that's all done, roughly put the light back together and put it in the oven. After 7 more mins, push it back together tightly. I didn't need any extra sealant as it went back together well.
The wiring is easy enough. The wiring loom they supply is just long enough for the 'Cat. The hardest bit is finding a good place to hide the chunky relays and ballast. I cable tied the relays to the frame behind the plastic underneath the clocks. The plastic hides them perfectly. I put the ballast on the right hand side behind the plastics to the right and below of the clocks. It's a tight fit but it works and looks neat.
Here's a link to their instructions if you haven't seen them already. They don't explain much about the bi-xenon wiring loom so had to work that one out but it's simple enough. Any questions don't hesitate to ask. I'll happily help.
http://www.theretrofitsource.com/pdf/trs_tech/Morimoto_Mini_D2S_Retrofit.pdf
Yeh it's such good value for money. Unfortunately the postage is quite expensive from the US but it's worth it. I upgraded the bulb from a Morimoto to a Philips bulb as that's the industry standard.
Regards
Mike
mikeyzf600- 6Silver
- Status :
Online Offline
Number of posts : 378
Hobbies : Electrician
Humour : Sarcastic
Registration date : 2012-07-18
![]()
![]()
Re: Headlight Upgrade
![]() weasley Wed Jan 02 2013, 08:08
weasley Wed Jan 02 2013, 08:08
After reading their instructions last night, yours make perfect sense. Nice job.
weasley- Admin2
- Status :
Online Offline
Number of posts : 1506
Hobbies : Yes
Humour : Yes
Registration date : 2008-11-07
![]()
![]()
Re: Headlight Upgrade
![]() mikeyzf600 Wed Jan 02 2013, 08:20
mikeyzf600 Wed Jan 02 2013, 08:20
The Gattling Gun shroud with a halo underneath does look good though!
Glad the instructions make sense. Like I said, any other questions give me a shout!
Regards
Mike
mikeyzf600- 6Silver
- Status :
Online Offline
Number of posts : 378
Hobbies : Electrician
Humour : Sarcastic
Registration date : 2012-07-18
![]()
![]()
Re: Headlight Upgrade
![]() weasley Wed Jan 02 2013, 10:53
weasley Wed Jan 02 2013, 10:53
It is VOSA's opinion that after-market HID modifications to halogen lights is illegal, but they concede that only a court can say for sure, and as far as I know this is currently untested in court.
Secondly, VOSA talk specifically about the replacement of a filament bulb by a HID one and that to do it properly you should replace the light unit with one designed for HID bulbs. In essence this is exactly what Mike has done here - the standard reflector part of the headlight becomes redundant and effectively just decoration; the projector unit is a new headlight and it is specifically designed for use with HID bulbs.
The MOT tester's manual for motorcycles mentions nothing about the type of headlight, only that it must meet the beam pattern requirements, which these kits would appear to do (you can specific RHD versions). There is also no mention of levelling or washing requirements.
Finally the ECE type approval regulations are only concerned with cars and larger vehicles - not motorcycles.
I think that practically this modification is a very good one, doing the required job of upping light output and focus without the downsides of blinding beam scatter that a simple bulb replacement can cause. I think that legally, it might eventually come down to the fact that these kits are not 'E'-marked, but as far as an MoT or the Vehicle Lighting regulations go, there is enough ambiguity or plain lack of legislation that there's little that can be done about it.
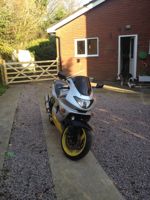
I am sold on the idea - just not sure I'm going to do it myself just yet as I rarely right at night. I'd also appreciate a whole bike picture, if possible, to see how it looks - I still have this thing about it looking like Turanga Leela (geeks will know what I am on about!).
PS - my experience of seeing HID bulbs in Cats is limited, but summarised thus:
- Ross's did visibly scatter and dazzle
- Steve's was impressively tight and controlled; he followed my for a long distance to BC last year and I was very impressed with his light
However, in all cases the main restriction for the Cat is the poorly designed reflector - a brighter bulb can not make the beam pattern better. Mike's upgrade looks like a great way around this.
weasley- Admin2
- Status :
Online Offline
Number of posts : 1506
Hobbies : Yes
Humour : Yes
Registration date : 2008-11-07
![]()
![]()
Re: Headlight Upgrade
![]() HEHORE Wed Jan 02 2013, 11:30
HEHORE Wed Jan 02 2013, 11:30

HEHORE- 1Gold

- Status :
Online Offline
Number of posts : 526
Hobbies : pizza man
Humour : dirty
Registration date : 2011-10-30
![]()
![]()
Re: Headlight Upgrade
![]() weasley Wed Jan 02 2013, 11:39
weasley Wed Jan 02 2013, 11:39
weasley- Admin2
- Status :
Online Offline
Number of posts : 1506
Hobbies : Yes
Humour : Yes
Registration date : 2008-11-07
![]()
![]()
Re: Headlight Upgrade
![]() mikeyzf600 Wed Jan 02 2013, 12:37
mikeyzf600 Wed Jan 02 2013, 12:37
Interesting reading. Thanks for doing the research more thoroughly than me. In that case, it should fly through the MoT.
I wasn't going to do it originally because I rarely ride at night - however, the odd time that I did I wanted to improve my chances of being able to see. And the relatively low cost of the mod made me do it. I'll try and take a picture of the whole bike later on. I'll also have to google Turanga Leela.
Hehore: As Weasley said, it's pretty straight forward. Twist off the D2S connector, twist off the bulb retainer. Pull out bulb and replace. However, Xenon bulbs are designed to last for 5+ years depending on use. I've just changed the ones on my BMW after 10 years of use. They were still working, just weren't as bright as they should have been.
Regards
Mike
mikeyzf600- 6Silver
- Status :
Online Offline
Number of posts : 378
Hobbies : Electrician
Humour : Sarcastic
Registration date : 2012-07-18
![]()
![]()
Re: Headlight Upgrade
![]() mikeyzf600 Wed Jan 02 2013, 21:57
mikeyzf600 Wed Jan 02 2013, 21:57
Regards
Mike
mikeyzf600- 6Silver
- Status :
Online Offline
Number of posts : 378
Hobbies : Electrician
Humour : Sarcastic
Registration date : 2012-07-18
![]()
![]()
Re: Headlight Upgrade
![]() mikeyzf600 Thu Jan 03 2013, 23:23
mikeyzf600 Thu Jan 03 2013, 23:23
A) For how shocking my "good" camera is,
B) The state of the garage!
Right, photos.
One with the headlight off:
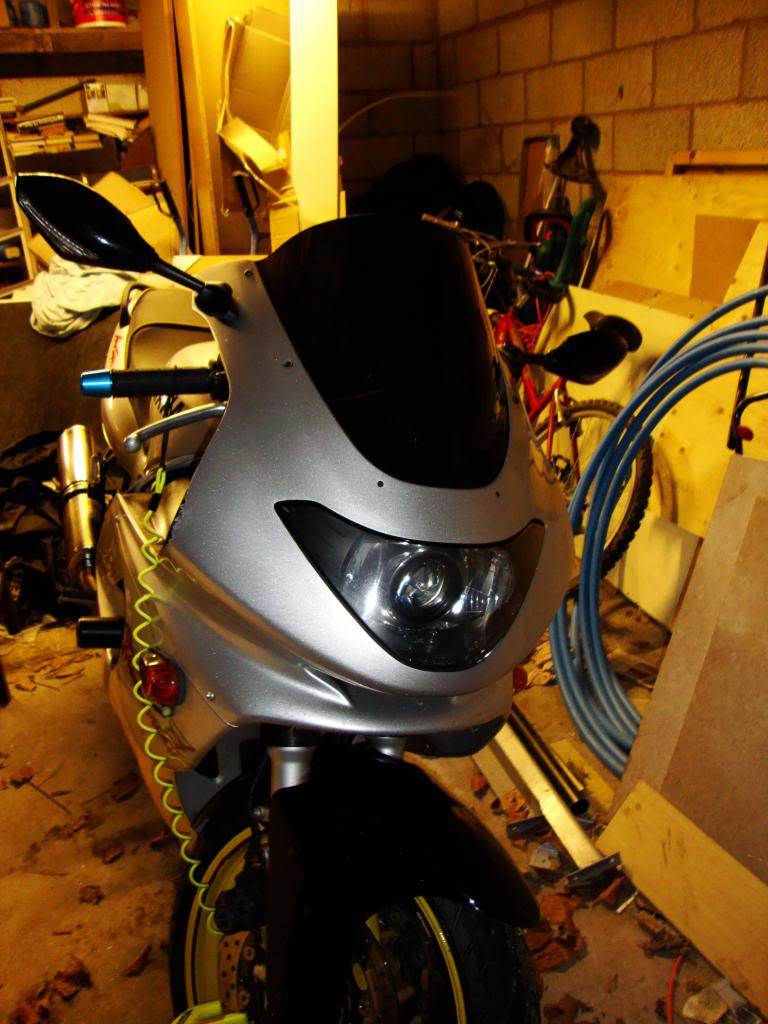
Headlight On: (This isn't quite the colour that it gives off in real life, Usually a very crisp white)

Colour flicker:

Regards,
Mike
mikeyzf600- 6Silver
- Status :
Online Offline
Number of posts : 378
Hobbies : Electrician
Humour : Sarcastic
Registration date : 2012-07-18
![]()
![]()
Re: Headlight Upgrade
![]() thunderstu600 Fri Jan 04 2013, 01:50
thunderstu600 Fri Jan 04 2013, 01:50
I think you've done a wicked job. well done.
As i am no expert in taking apart motorbikes an fitting stuff to it, i dont like to fettle with things i dont know but once i pass my test, any chance you want to make some money and do my bike the same way you've done yours.
Its only up the m50 so shouldn't be too much of a trip for me.
If you were interested pm me your price, if not you can tell me where to go lol
cheers stu
thunderstu600- 7Silver

- Status :
Online Offline
Number of posts : 445
Hobbies : xbox black ops 2, Cycling and Motorbikes, Fishing and any other faze I go through lol playing ice hockey now too
Humour : i'm as serious as everyone else :)
Registration date : 2012-12-10
![]()
![]()
Re: Headlight Upgrade
![]() weasley Fri Jan 04 2013, 07:36
weasley Fri Jan 04 2013, 07:36
I also see your bullet LEDs; I currently have the parts to do a similar visibility upgrade for mine. I plan to replace the stock indicator with flush-mounts (like yours), but with clear lenses. Then I'll wire them to be DRLs and fit bright white LEDs in them. I'll then replace the mirrors with ones with built-in LED indicators. I like the idea of having bright LEDs for visibility but as WIDE as possible (like you have, rather than near the centre of the bike).
weasley- Admin2
- Status :
Online Offline
Number of posts : 1506
Hobbies : Yes
Humour : Yes
Registration date : 2008-11-07
![]()
![]()
Re: Headlight Upgrade
![]() mikeyzf600 Sun Jan 06 2013, 17:15
mikeyzf600 Sun Jan 06 2013, 17:15
Stu:
I'm the same, I'm absolutely no expert in taking bikes apart, but this was very simple. The problem with me doing yours is that it would take a while, as I'd have to remove the light from the bike, separate it etc etc. However, I'm more than willing to do a detailed how to on how to remove the headlight and do the install? I'm not telling you where to go, but its a mod that quite simple and would save you money too. Let me know if you want the how to doing?
Weasley:
I'm glad it doesn't look odd. Sounds like a good visibility mod. However, I've got the integrated LED's in my mirrors, and I will say that, although they are visible, I wouldn't rely on them as my only front indicator. They are good as extra visibility though. Yeh, they do say to have them as wide as possible, and if possible, try and replicate a face, as it'll help to get you noticed.
Regards,
Mike
mikeyzf600- 6Silver
- Status :
Online Offline
Number of posts : 378
Hobbies : Electrician
Humour : Sarcastic
Registration date : 2012-07-18
![]()
![]()
Re: Headlight Upgrade
![]() thunderstu600 Sun Jan 06 2013, 21:21
thunderstu600 Sun Jan 06 2013, 21:21
cheers
stu
thunderstu600- 7Silver
- Status :
Online Offline
Number of posts : 445
Hobbies : xbox black ops 2, Cycling and Motorbikes, Fishing and any other faze I go through lol playing ice hockey now too
Humour : i'm as serious as everyone else :)
Registration date : 2012-12-10
![]()
![]()
Re: Headlight Upgrade
![]() hardhat_harry Tue Jun 24 2014, 23:54
hardhat_harry Tue Jun 24 2014, 23:54
Can someone post the instructions from the retrosite as the seem to have disappeared of their website

hardhat_harry- 2Bronze

- Status :
Online Offline
Number of posts : 12
Registration date : 2014-03-18
![]()
![]()
Re: Headlight Upgrade
![]() mikeyzf600 Wed Jun 25 2014, 08:47
mikeyzf600 Wed Jun 25 2014, 08:47
Regards
Mike
mikeyzf600- 6Silver
- Status :
Online Offline
Number of posts : 378
Hobbies : Electrician
Humour : Sarcastic
Registration date : 2012-07-18
![]()
![]()
Re: Headlight Upgrade
![]() hardhat_harry Wed Jun 25 2014, 09:24
hardhat_harry Wed Jun 25 2014, 09:24
mikeyzf600 wrote:When you say a £50 one from China, do you mean a HID kit or a full projector retrofit? If it's just the HID kit, their instructions won't help because they're all to do with the projectors.
Regards
Mike
No its a full projector one.
http://www.ebay.co.uk/itm/331222606176?ssPageName=STRK:MEWNX:IT&_trksid=p3984.m1439.l2649
I was considering a HID but I could see it was the thundercat reflector that was at fault not the bulb (already upgraded to 100/90 bulb).
hardhat_harry- 2Bronze
- Status :
Online Offline
Number of posts : 12
Registration date : 2014-03-18
![]()
![]()
Re: Headlight Upgrade
![]() mikeyzf600 Wed Jun 25 2014, 09:54
mikeyzf600 Wed Jun 25 2014, 09:54
http://www.theretrofitsource.com/diy-installation-guides.html
Obviously, they're for their projectors and kits so will differ from the one you're getting.
I hope you don't suffer reliability issues, it's a pain having to take apart the fairings and headlight to do the mod, last thing you want to be doing is taking it apart again for a fault. The only thing id recommend not skimping on is the projector. The rest is fairly simple to change if it goes wrong. That's just my 2p worth though.
Regards
Mike
mikeyzf600- 6Silver
- Status :
Online Offline
Number of posts : 378
Hobbies : Electrician
Humour : Sarcastic
Registration date : 2012-07-18
![]()
![]()
Page 1 of 2 • 1, 2 ![]()
![]()

